


E-commerce applications are the backbone of today’s online shopping world. In this post, we will see how to build an e-commerce application easily using Java, JHipster, Spring Boot, and React. Since we will be scaffolding the application, the post will focus on how to build a shopping cart and payment integration rather than how to build a Java web application.
Tools and technology we will use
We will use the below tools and technology to build this application:
- JHipster: JHipster is a rapid application development platform. It can quickly create web applications and microservices with production-grade code. Head over to the installation instructions to set it up. JHipster can scaffold applications with a wide variety of languages, frameworks, and configurations. For this tutorial, we will stick with the following major options. You don’t have to install anything for this, as JHipster will manage these for you.
- Spring Framework: Spring is an application framework in Java that comes with all the bells and whistles required for enterprise-grade Java application development. It comes with Spring Boot which makes development faster and convenient. This lets us focus more on our business needs rather than spending time setting up technical integrations.
- React: A popular JavaScript UI library that helps build modern scalable front ends. We will be writing React code using TypeScript. We will also be using a few other components like Redux and React Router from the React ecosystem.
- Bootstrap: An UI framework for web applications with a variety of themes and customizations.
- Gradle: Gradle is a Java build orchestration tool that provides a highly customizable and easy-to-use domain-specific language (DSL).
- Webpack: A front-end build tool for modern web applications
- Adyen Payments Platform: Adyen is one of the leading payment platforms for medium to large scale businesses. It provides a plethora of payment options and provides SDKs for easy integrations. And I also happen to work for Adyen 😄
- Docker: A containerization technology, which we will use it to quickly run our database. Make sure you have Docker and Docker compose installed. If you can run a local MySQL setup, you won’t need Docker.
- Git: Distributed version control system for source code management. Make sure you have Git installed.
Prerequisite
To follow this tutorial effectively you would need to be familiar with at least the below tools and technology
- Java
- Spring Framework
- React
- Redux
- Bootstrap
We have a sample application built to accompany this post. Each section here is points to a particular commit in the sample app to help give you a better picture of what is being changed.
Designing the entity model
Since we are going to scaffold our application, it is important to make sure that we have the correct entity model for the e-commerce application. We will use the JHipster Domain Language(JDL) to do this. Below is the JDL model for an e-commerce application:
The User entity is built-in from JHipster and hence we don't have to define it in JDL. However, we can define their relationships. Here is a UML visualization of the same:
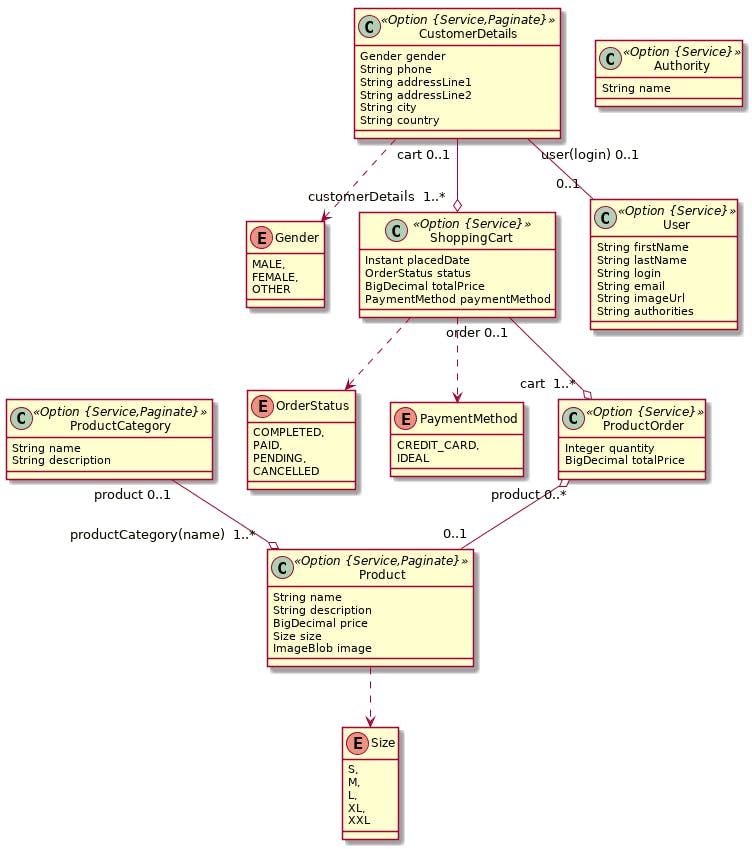
Head over to JDL Studio if you want to visualize the model and make any changes.
Next, create a new folder and save the above to a file named app.jdl within that folder.
Scaffolding the application
Now that we have our model in place, we can go ahead and scaffold a Java web application using JHipster. First, let’s define our application. Add the below snippet to the file ( app.jdl) we created earlier.
We just defined an application named store that uses JSON Web Token (JWT) as the authentication mechanism, MySQL as the production database, Gradle as the build tool and React as the client-side framework. You can see all the options supported by JHipster here. We also defined that the application uses all the entities we defined with entities *.
Now, let’s invoke JHipster to scaffold the application. Run the below command inside the folder where we created app.jdl:
jhipster import-jdl app.jdl
This will create our application, install all necessary dependencies, and initialize & commit everything to Git. Make sure you have Git installed on your system.
Let’s check out the application. Run the below command to run the application in development mode:
./gradlew
After running the application, visit https://localhost:8080 and use the default users mentioned on the home page to log in and explore the application. You can find the commit in the sample application.
You can also run the generated unit and integration tests with this command:
./gradlew npm_test test integrationTest
So far, the generated application doesn’t have any specific business logic or custom screens. It is just a CRUD application for the model we defined. If you are familiar with Spring Framework and React you should be able to navigate the source code created easily. The Spring/React application created by JHipster is not the focus of this post, and for that I recommend you head over to documentation provided by JHipster, Spring, and React.
Building a products landing page
Now that our application and all the CRUD APIs are ready, let us build a product landing page that lists all the products offered by the store.
We will convert src/main/webapp/app/modules/home/home.tsx to be our product landing page. This involves updating the JSX to show the products list and using the product redux reducer to fetch the data from product API. Here is the complete diff for home.tsx and here is the entire changelog for this step.

Start the application client-side in dev mode to speed up development. Keep the application running in a terminal using ./gradlew if it not already running from the previous step. In a new terminal, run npm start and it will start a development server for the client-side, which proxies API calls to the backend and open up a new browser window pointing to https://localhost:9000.
At this point, the front-end and back-end are running in development mode with hot reload functionality. This means the entire application will automatically reload when we make any changes (the browser will reload as well). For backend changes, the reload will happen when you compile using your IDE or by running ./gradlew compileJava.
Update home.tsx according to the changelog and see the changes reflected on the home page.
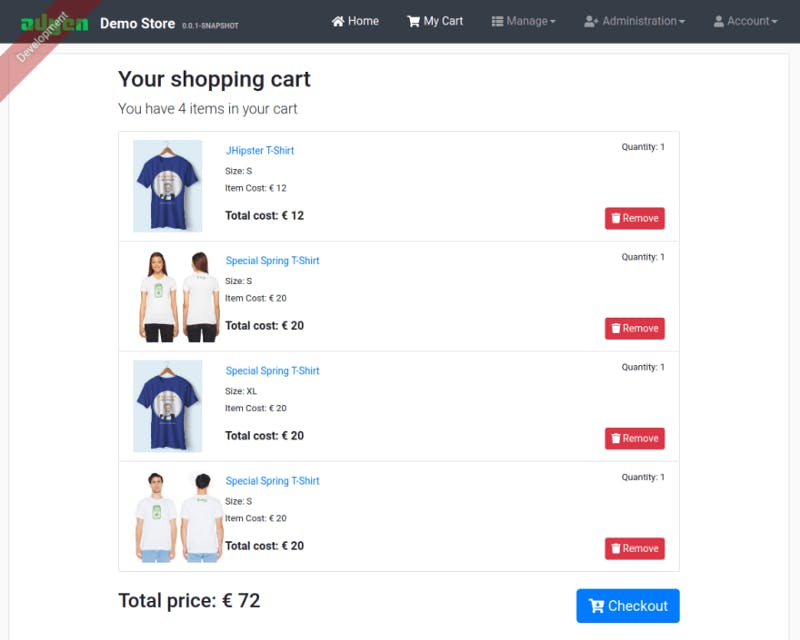
Building the shopping cart
Now let us build a persistent shopping cart page, where we can list all the items added to the cart by the user. The user can also start checkout from this page. The shopping cart will hold the items added until the payment is complete even if the user logs out or uses the application in a different machine as the state is persisted automatically using the generated CRUD API:
For this feature, we also add/update the below on the server-side:
- security configurations to ensure that a user can update only his/her shopping cart when logged in. Only administrators will be able to see the shopping cart of other users and manage all entities.
- New REST endpoints to add and remove products to and from a shopping cart.
- Service methods
- Database operations.
These updates are quite straightforward due to the framework provided by JHipster and Spring.
On the client-side, we will update:
- shopping-cart reducer to talk to the new endpoints.
- Add a new route and module to show the shopping cart.
The shopping cart React page uses the below snippet. Note that the listing content is quite similar to the product listing page.
Here is the entire changelog for this feature. Make the changes to the application and see the changes reflected on the shopping cart page.
Please note that I also made some improvements to the fake data generated by JHipster in this commit and made improvements to product and cart pages in this commit. I also fixed the tests in this commit. Update your application according to these changelogs as well.
Payments integration
Now that our shopping cart is ready, we can integrate the Adyen checkout API to make payments. First, make sure you sign up for an Adyen test account. Follow this guide to get your API keys and Merchant Account. You will also need to generate an origin key per domain you use to collect payments. In our case for development use, we need to create an origin key for http://localhost:9000 and [http://localhost:8080](http://localhost:8080.).

We will use the Adyen Java API library to make API calls. We will add the dependency to our Gradle build.
We also need to exclude the Adyen domain in the content security policy defined in src/main/java/com/adyen/demo/store/config/SecurityConfiguration.java.
We will create a new Spring REST controller that will use the Adyen Java library and make payment API calls for us. Here is the src/main/java/com/adyen/demo/store/web/rest/CheckoutResource.java class. Here is a method from this class.
The controller ensures that all actions are done against the active shopping cart of the user logged into the session. This ensures that security issues like man-in-the-middle attacks and request spoofing do not happen. When payment is completed successfully, we close the active shopping cart, ensuring every user has only one active shopping cart at a time.
On the client-side, we will create a React page to show the payment options and payment result status, a redux reducer to talk to the new API endpoints. We will also download and add the Adyen client-side resources to our index.html file.
Here are the important bits of the checkout page since this is where we handle the Adyen javascript integration from within React.
Here is the entire changelog for this feature. Make the changes to the application accordingly and see the changes reflected on the shopping cart page. Make sure to set the following environment variables first.
Running the app in production
Now that we have made all the required changes, let us compile and run our app in production mode.
First, let us run the generated unit and integration tests to ensure we haven’t broken anything:
./gradlew npm_test test integrationTest
Now, let’s start a MySQL database as our application uses an in-memory H2 database for development and MySQL for production, this makes development easier. We will be using Docker compose to run the DB. You can also manually run a MySQL DB if you prefer.
docker-compose -f src/main/docker/mysql.yml up -d
The above command will start up MySQL DB from the included Docker compose file. Now, run the below command to run the application in production mode:
./gradlew -Pprod
You can also package the application using the command ./gradlew -Pprod clean bootJar and then run the JAR using java -jar build/libs/*.jar
Now, visit https://localhost:8080 and use the default users mentioned on the home page to log in and explore the application. You can use the test cards from Adyen to simulate payments
Conclusion
That’s it. We have successfully built an e-commerce application complete with a product checkout and payment flow that can accept multiple forms of payment. I highly recommend that you check out the sample application to get a better context of what has been built.
The example application also has a user registration flow that you can checkout
I hope this helps anyone trying to build shopping carts and payment flows for their Java E-Commerce application.
If you like this article, please leave a like or a comment. Let us know if you would like to see more of similar content on our blogs.
Cover image credit: Photo by Paul Felberbauer on Unsplash
Originally published at dev.to on June 24, 2020.
Technical careers at Adyen
We are on the lookout for talented engineers and technical people to help us build the infrastructure of global commerce! If you are interested in finding out more, check out our Developer vacancies, or see Careers at Adyen.
Developer newsletter
Get updated on new blog posts and other developer news. Subscribe now.